Thrust Transfer Structure Design and Verification
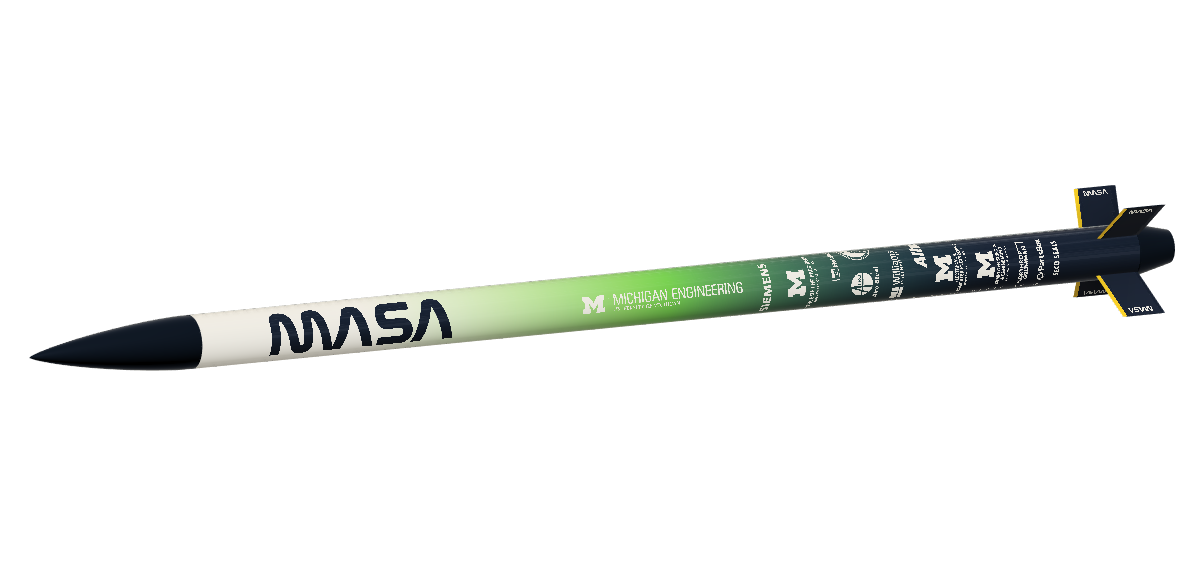
As part of the Michigan Aeronautical Science Association Structures team, I redesigned the Thrust Transfer Structure for Citron, MASA’s liquid rocket vehicle.
The TTS transfers engine thrust into the rocket airframe through six compression-loaded aluminum struts. My work combined first-principles structural analysis, automated design exploration, finite element analysis, joint design, packaging, and full-system CAD integration.

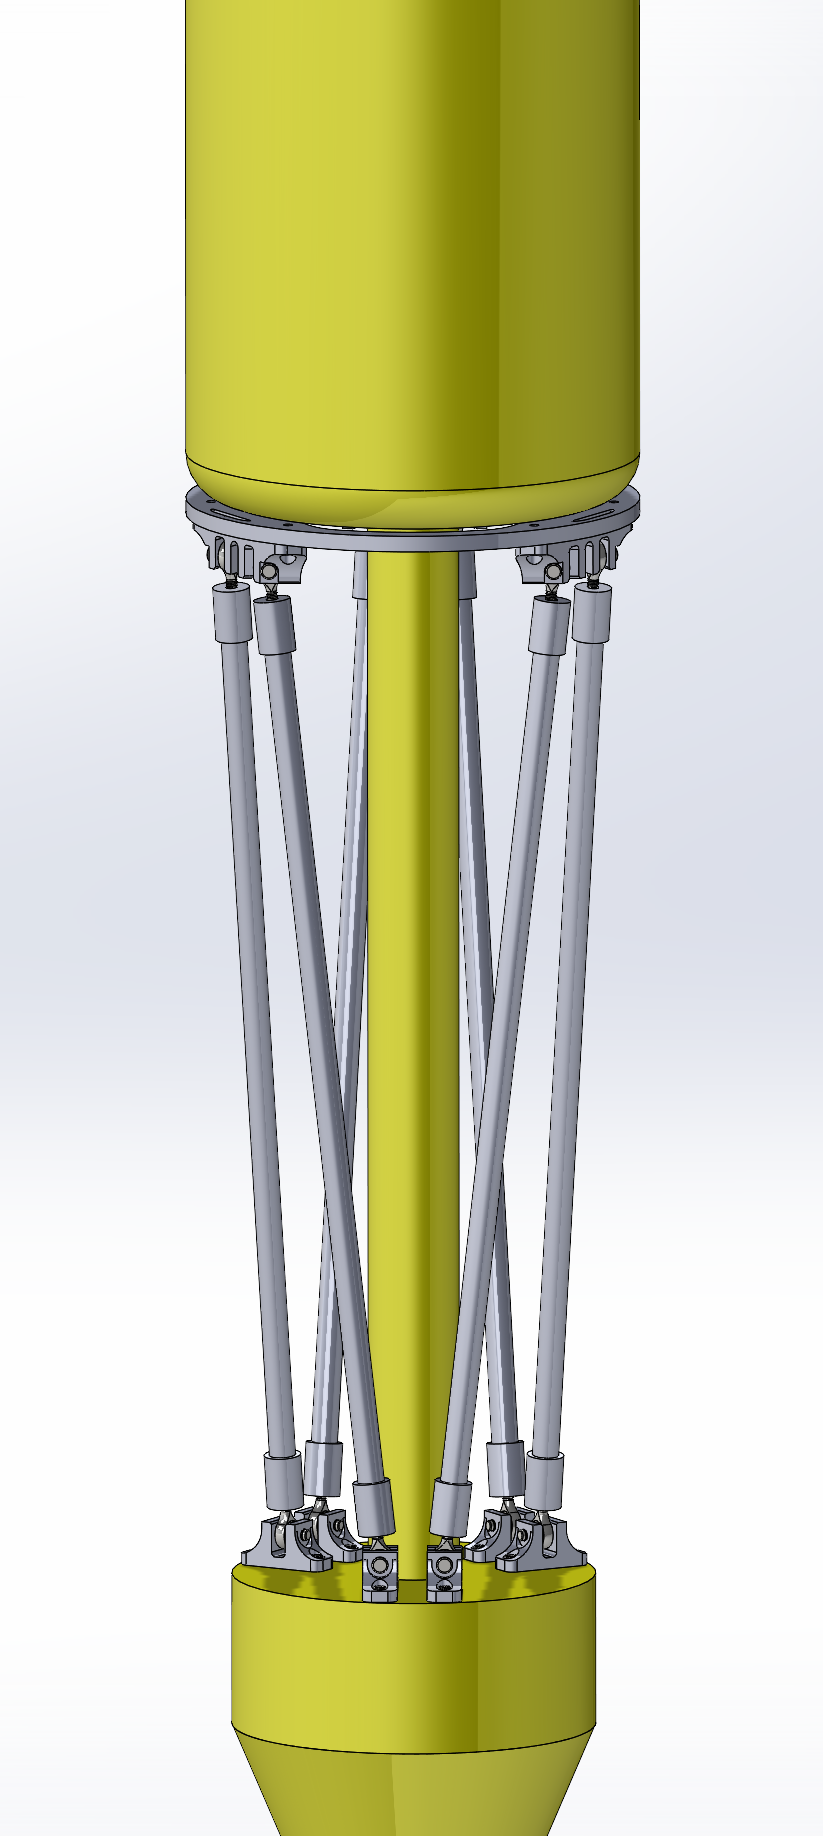
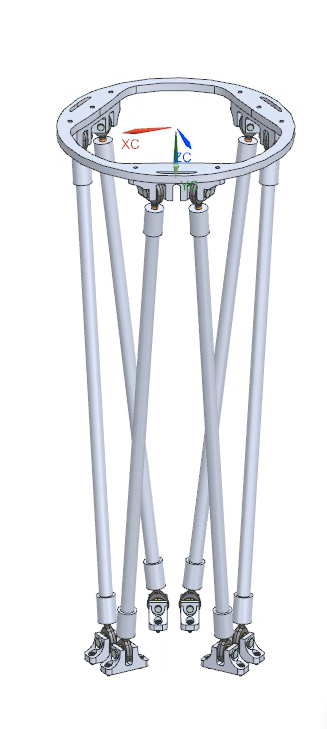
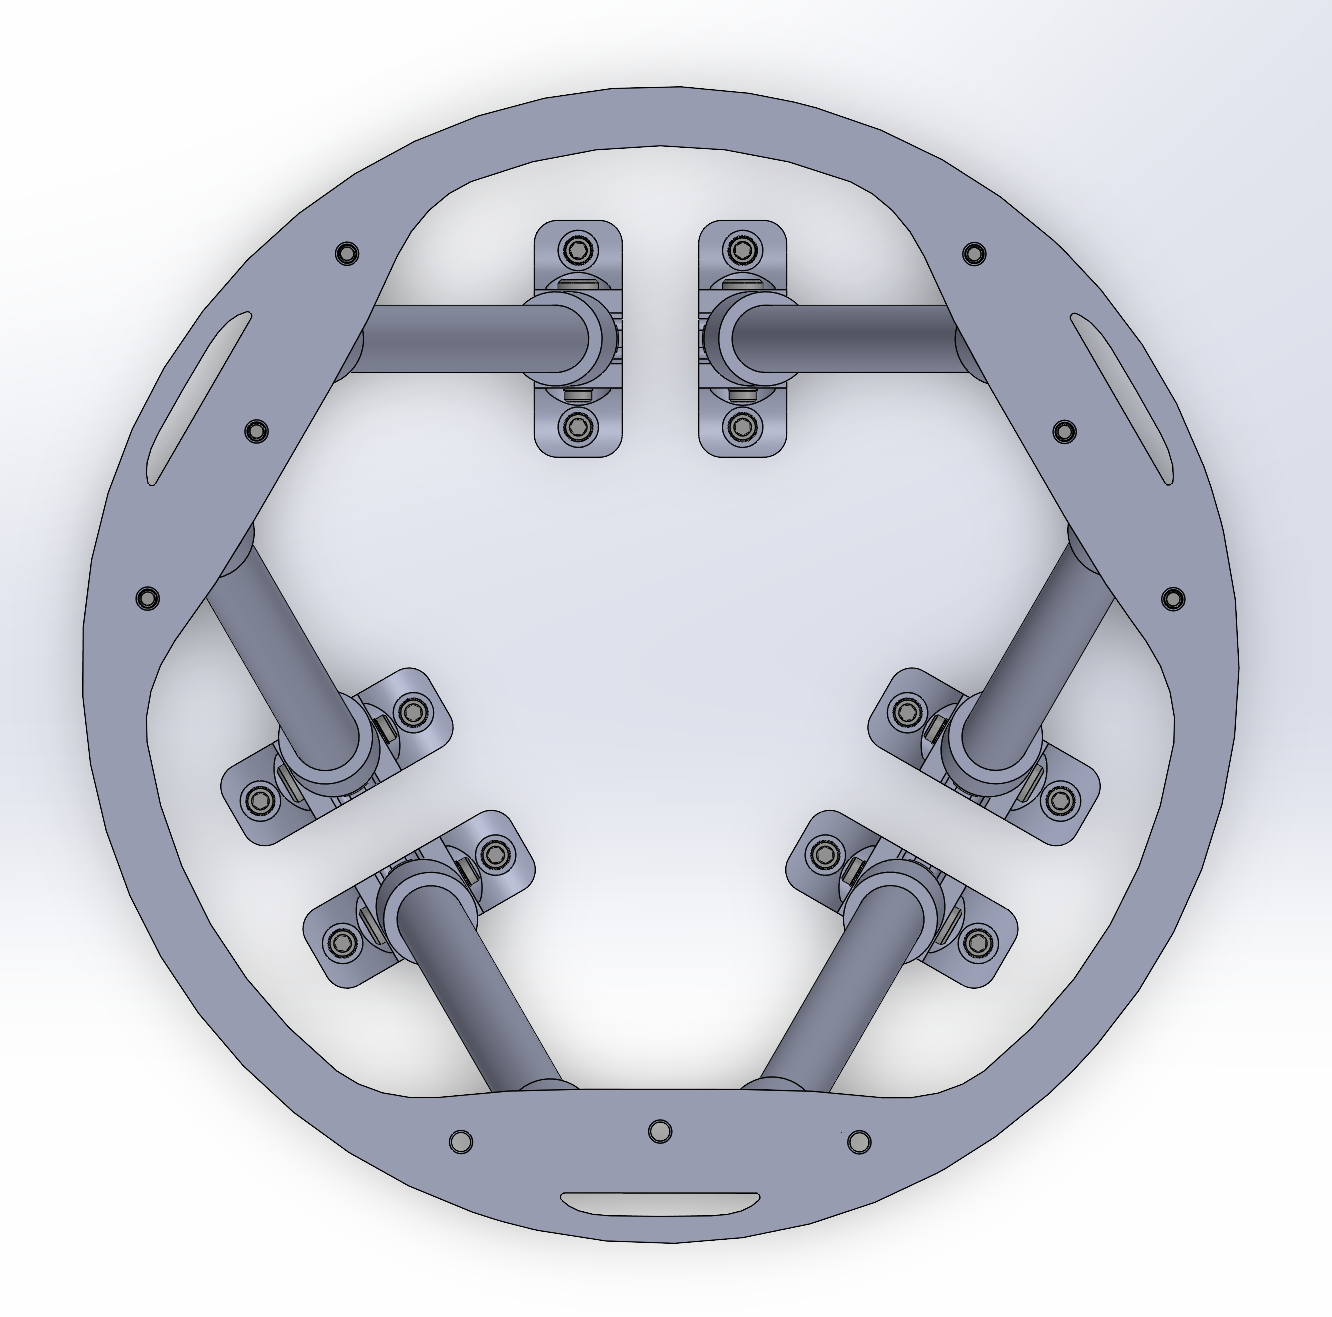
Current Summer 2026 TTS design integrating six hollow aluminum struts, compact clevis-style joints, and preliminary engine and tank interface rings.
Current Results
- six primary 6061-T6 aluminum struts
- compact clevis-style top and bottom joints
- engine-side interface ring redesigned using ANSYS topology optimization
- topology result converted into simplified, manufacturable CAD
- clevis-pin retention concept developed using Smalley retaining rings
- 2,965 N axial reference load used for isolated strut verification
- analytical and FEA axial stress of approximately 23.4 MPa
- 2.25× ideal global buckling factor of safety under the evaluated member-level load case, exceeding the 1.5× design requirement
- global buckling FEA within approximately 3% of the Euler calculation
- local wall-buckling result converged with respect to coupon length and mesh density
- converged ideal local-buckling eigenvalue of approximately 2.13 MN
- local wall buckling screened out as a governing failure mode
Where the TTS Sits in the Rocket

Sketching the location of the thrust transfer structure relative to the engine, propulsion bay, tank structure, and surrounding rocket airframe.
The thrust transfer structure sits inside the lower portion of the rocket between the propulsion system and the vehicle structure.
Its job is to:
- receive thrust at the engine-side interface
- carry the load primarily as axial compression through six struts
- transfer the load into the tank-side and vehicle structure
- fit around propulsion hardware, plumbing, injector interfaces, fasteners, and assembly tooling
Although the basic load path sounds simple, the design is highly constrained.
Increasing tube diameter may improve buckling resistance but consume valuable packaging volume. Larger joints may improve strength but interfere with plumbing. Additional adjustability may simplify assembly but introduce more components, tolerances, and possible failure points.
The project therefore became a system-level mechanical design problem rather than only a structural calculation.
What I Owned
My work included:
- first-principles reaction-force and member-load calculations
- MATLAB structural sizing GUI development
- Euler and Johnson buckling implementation
- parametric geometry and cross-section trade studies
- six-strut TTS architecture development
- compact clevis-style top and bottom joint design
- clevis-pin retention and retaining-ring selection
- supplier coordination for prototype retaining-ring samples
- engine-side interface-ring topology optimization
- topology-driven CAD redesign for manufacturability
- static stress verification in ANSYS
- global eigenvalue-buckling analysis
- local wall-buckling analysis
- coupon-length convergence
- mesh convergence
- full assembly CAD integration
- identification of the remaining joint and interface risks
First-Principles Structural Sizing
One of the first engineering questions was:
What structural members actually make sense for this application?
I began with free-body diagrams and hand calculations to estimate:
- reaction forces
- axial member loads
- axial stress
- Euler buckling load
- factor of safety
The calculations worked, but every change in rod length, mounting angle, diameter, wall thickness, or cross-section required another full set of calculations.
To accelerate that process, I converted the analysis into a MATLAB structural sizing GUI.

MATLAB geometry and loading interface used to calculate reaction forces and axial member loads.
The tool models each strut as an idealized pin-pin two-force member carrying axial compression.

Results interface reporting reaction forces, axial stress, critical buckling load, and factor of safety.
Key outputs include:
- axial member force
- reaction forces
- cross-sectional area
- axial stress
- Euler or Johnson critical buckling load
- buckling factor of safety
- comparisons between candidate cross-sections
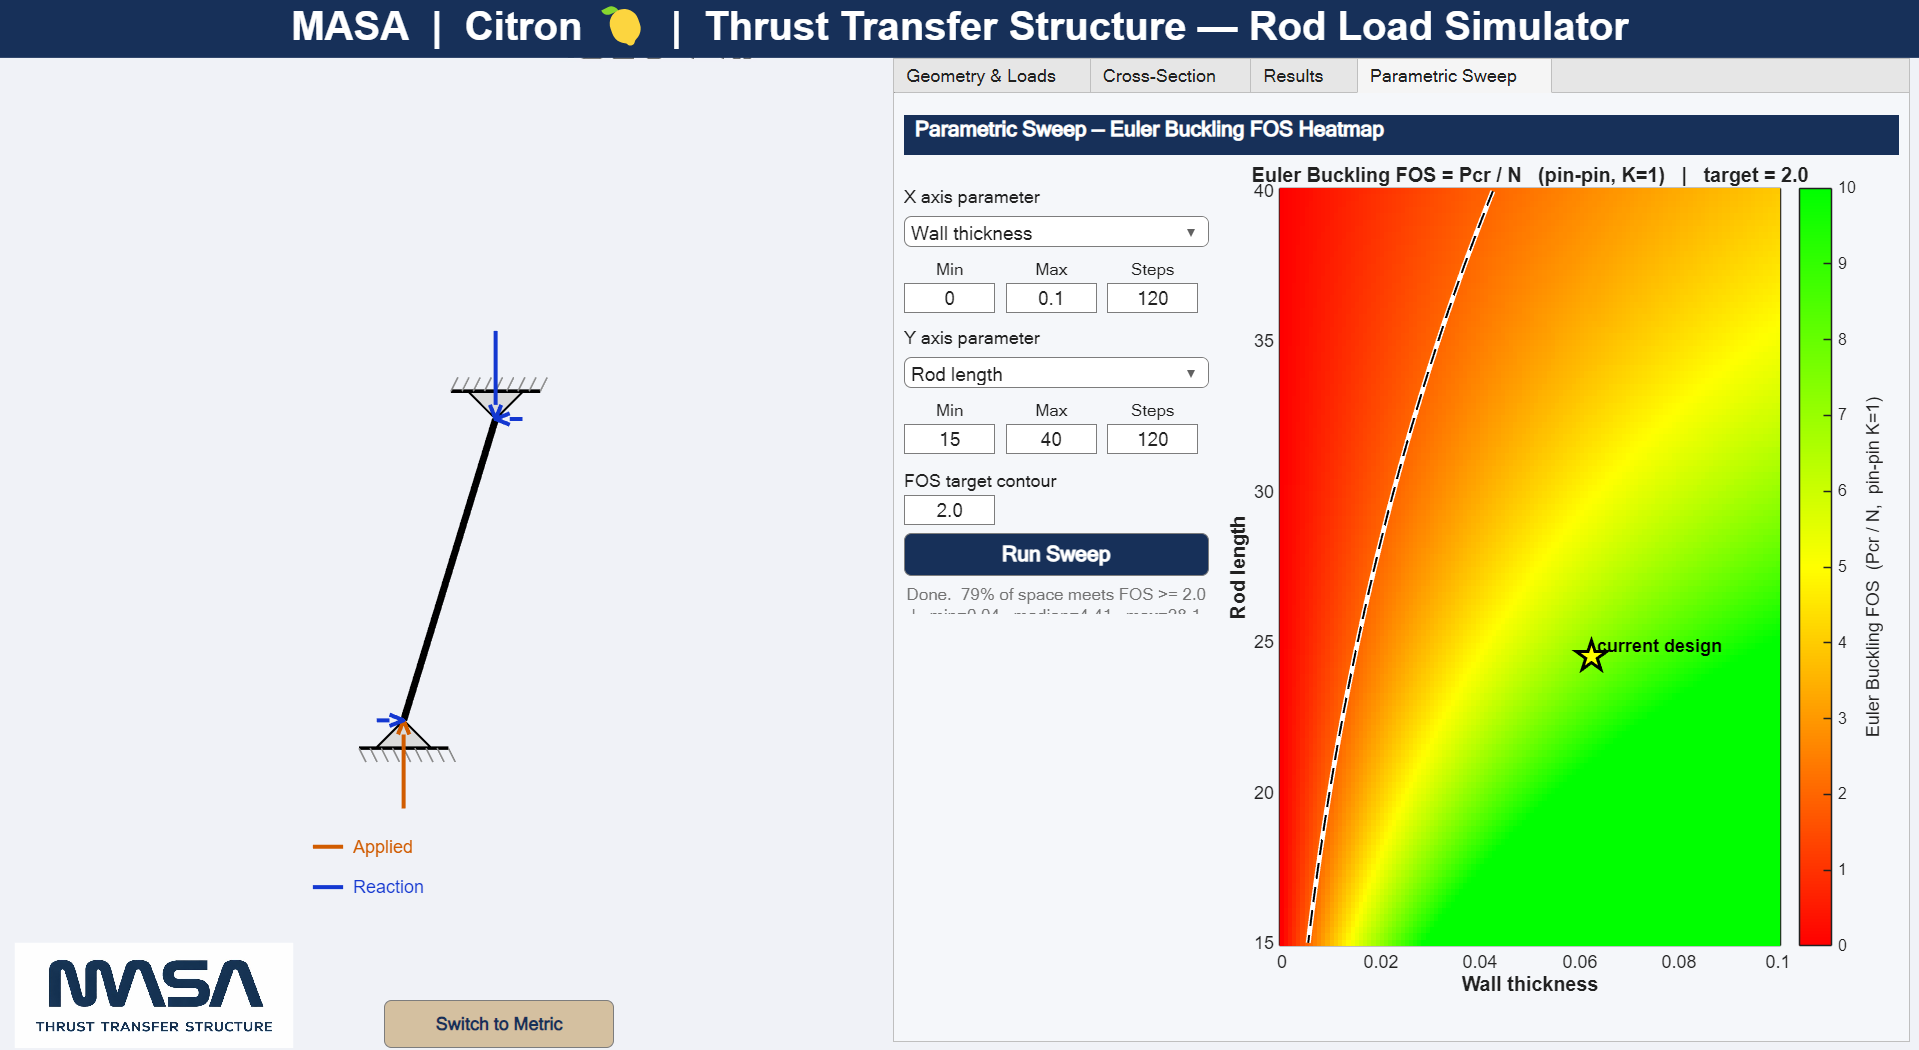
I also developed parametric sweeps to visualize how the design changed across combinations of geometry variables.

Parametric sweep used to compare buckling performance across changing member dimensions.
This transformed the process from checking one geometry at a time into exploring complete design trends.
The original tool relied primarily on Euler buckling. Euler theory is appropriate for slender columns, but it becomes less representative as the slenderness ratio decreases.
I therefore expanded the tool to incorporate Johnson buckling behavior so the selected analytical model better matched the applicable slenderness regime.

Initial hand calculations used to establish and independently check the equations later implemented in the MATLAB tool.
The GUI was used as a first-pass design-space filter rather than final structural proof. Its purpose was to identify promising configurations before higher-fidelity analysis.
Cross-Section and Material Trade Study
In addition to sizing a single member geometry, I used the MATLAB tool to compare hollow circular and hollow square cross-sections across changes in outside dimension and wall thickness.
For each candidate section, the same analytical model reported cross-sectional area, axial stress, Euler or Johnson critical buckling load, and buckling factor of safety. This let me compare section geometry on a consistent basis and quantify how changes in member dimensions affected buckling performance.
I also participated in team discussions around the broader member selection, where the structural results from the MATLAB tool were considered alongside packaging, fabrication, integration, and availability constraints. These discussions, together with input from other Structures team members, guided the final selection rather than the decision coming from the analytical model alone.
Composite tubing, including carbon fiber, was also considered because of its potential mass savings. However, sourcing and fabricating suitable composite tubes would have been more difficult for a student team. Structural analysis and validation would also be more involved because the composite would require orthotropic material properties and laminate-specific failure criteria rather than the simpler isotropic aluminum model.
The team ultimately selected hollow circular 6061-T6 aluminum tubing as the best overall fit for the TTS. My contribution was developing the sizing tool, performing the cross-section and buckling analysis, and participating in the team trade discussions that supported that decision.
ANSYS Structural Verification
After narrowing the design space analytically, I used ANSYS to verify the isolated strut behavior and investigate the relevant buckling modes.
The selected tube geometry was:
- 6061-T6 aluminum
- 5/8-inch outside diameter
- 1/8-inch wall thickness
- 3/8-inch inside diameter
- approximately 21-inch pin-center-to-pin-center length
For the isolated member model, I used a 2,965 N axial reference load.
This corresponds numerically to one-sixth of a 4,000 lbf system-thrust case. It was used as a controlled member-level reference load rather than a complete prediction of the final strut-force distribution.
The actual member forces in the assembled TTS will depend on strut angle, ring stiffness, interface stiffness, manufacturing variation, load eccentricity, and unequal load sharing.
Static Axial Stress
For the selected tube geometry, the cross-sectional area is approximately 126.7 mm².
The analytical axial stress was:

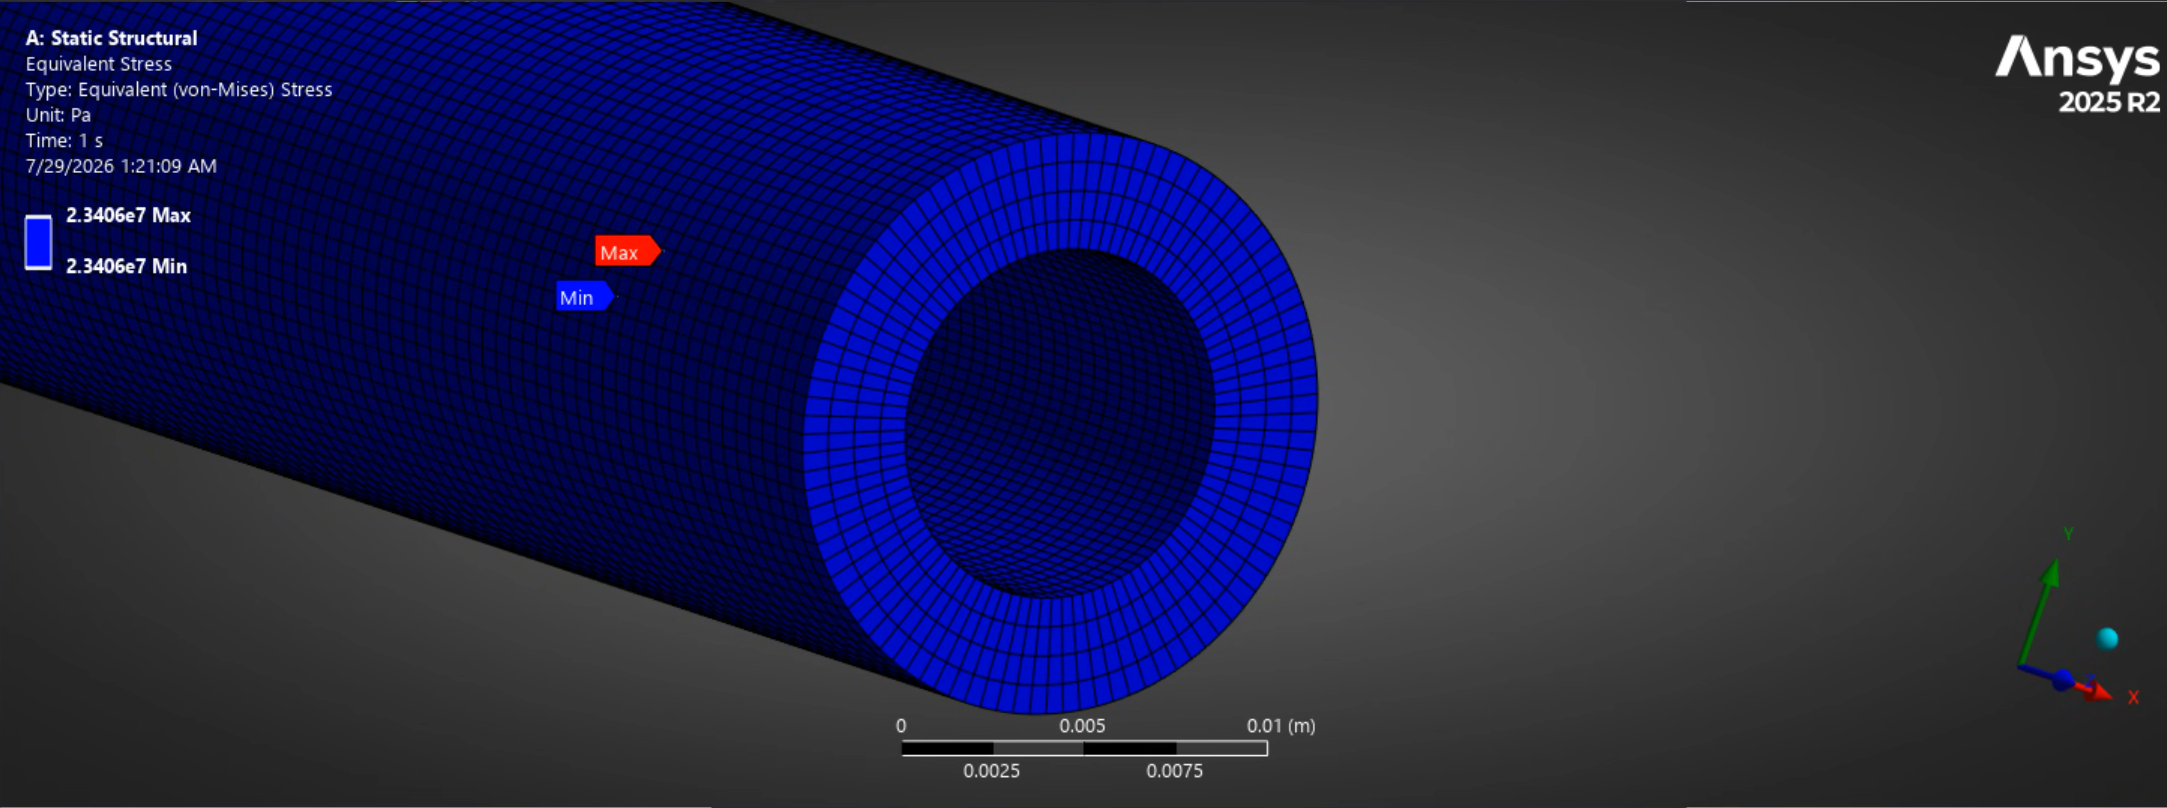
Static structural analysis of the isolated TTS strut under a 2,965 N compressive reference load.
ANSYS predicted approximately 23.4 MPa through the uniform tube section, closely matching the analytical axial-stress calculation.
This agreement verified that the simplified model’s:
- applied load
- tube geometry
- material properties
- cross-sectional area
- boundary conditions
were behaving as intended before progressing to buckling analysis.
A separate higher-detail model that included the tube end cap geometry produced a larger local stress near the load-transfer region.
This indicated that the tube to end-cap interface required joint-level investigation rather than treating the complete strut as a perfectly uniform member.
Global Eigenvalue Buckling
Because the members carry compression, material yielding was not the only possible failure mode.
I first estimated the ideal global column-buckling load using Euler buckling for a pin-pin member:
The hand calculation predicted a critical buckling load of approximately 1,460 lbf.
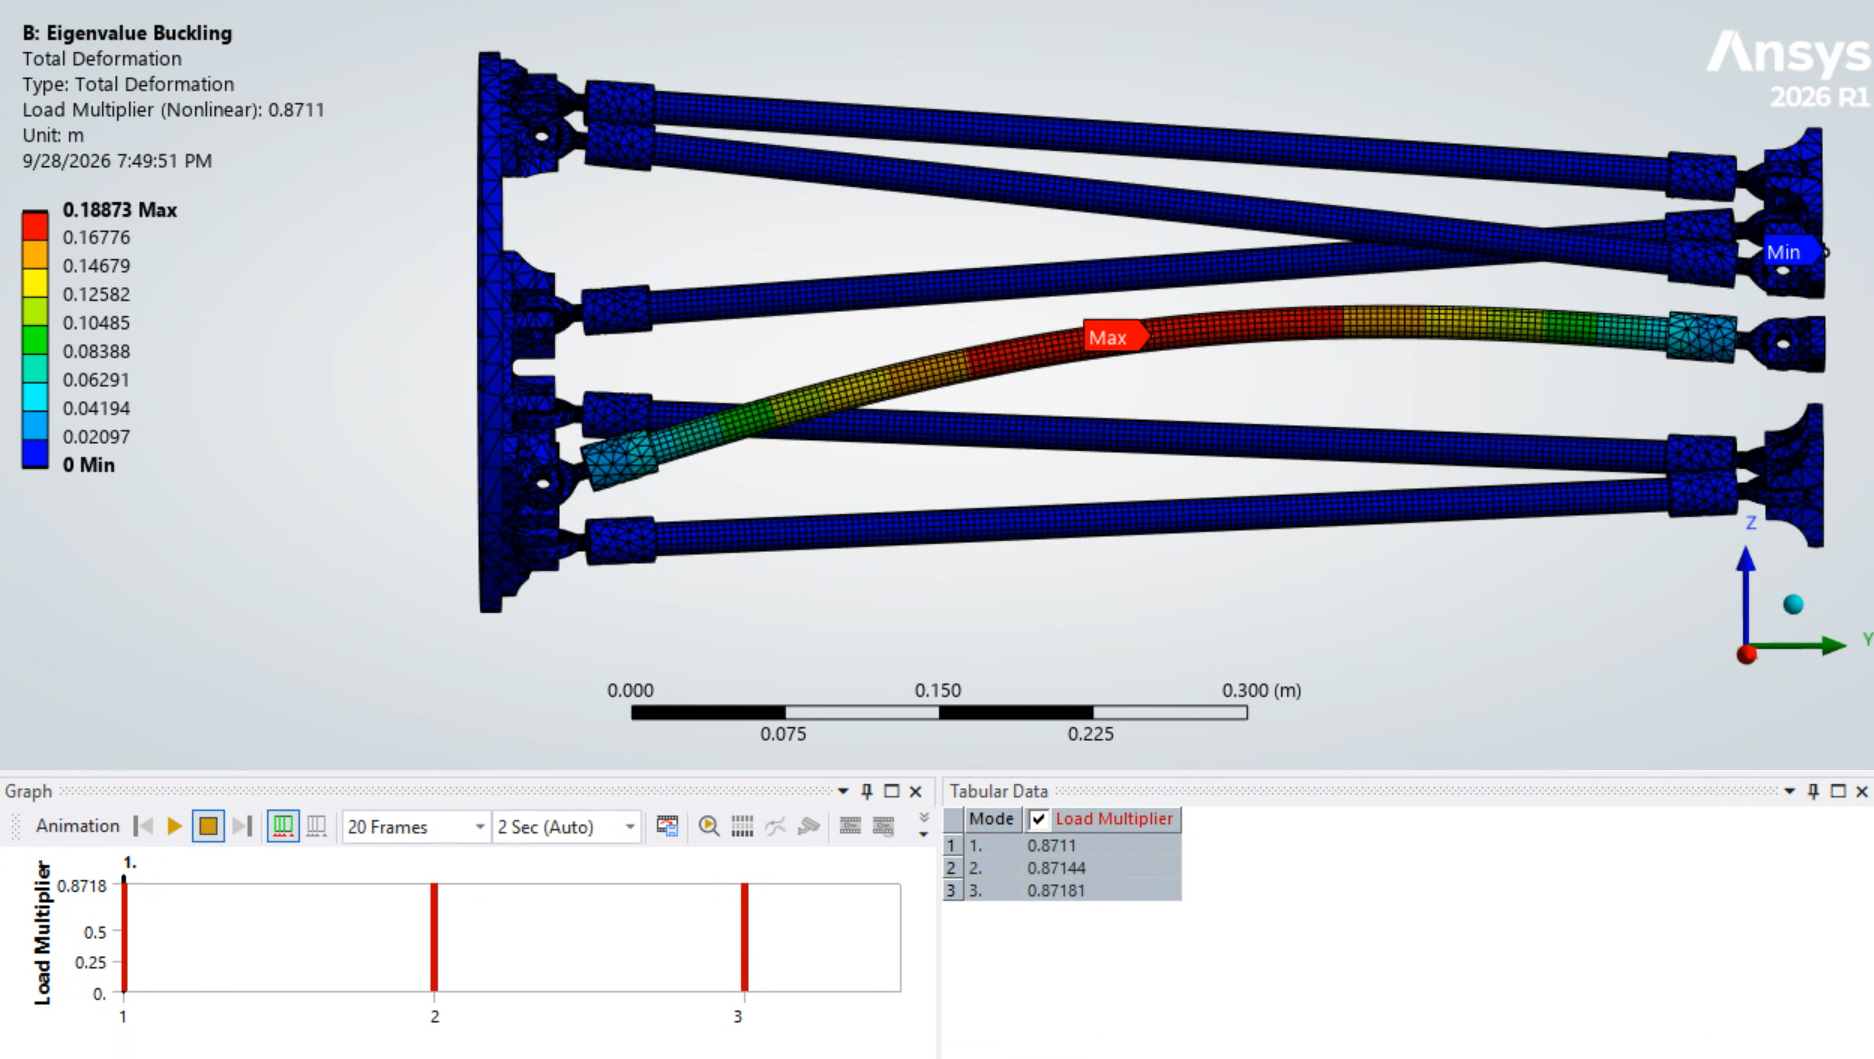
I then performed a prestressed eigenvalue-buckling analysis using the solved static load case.
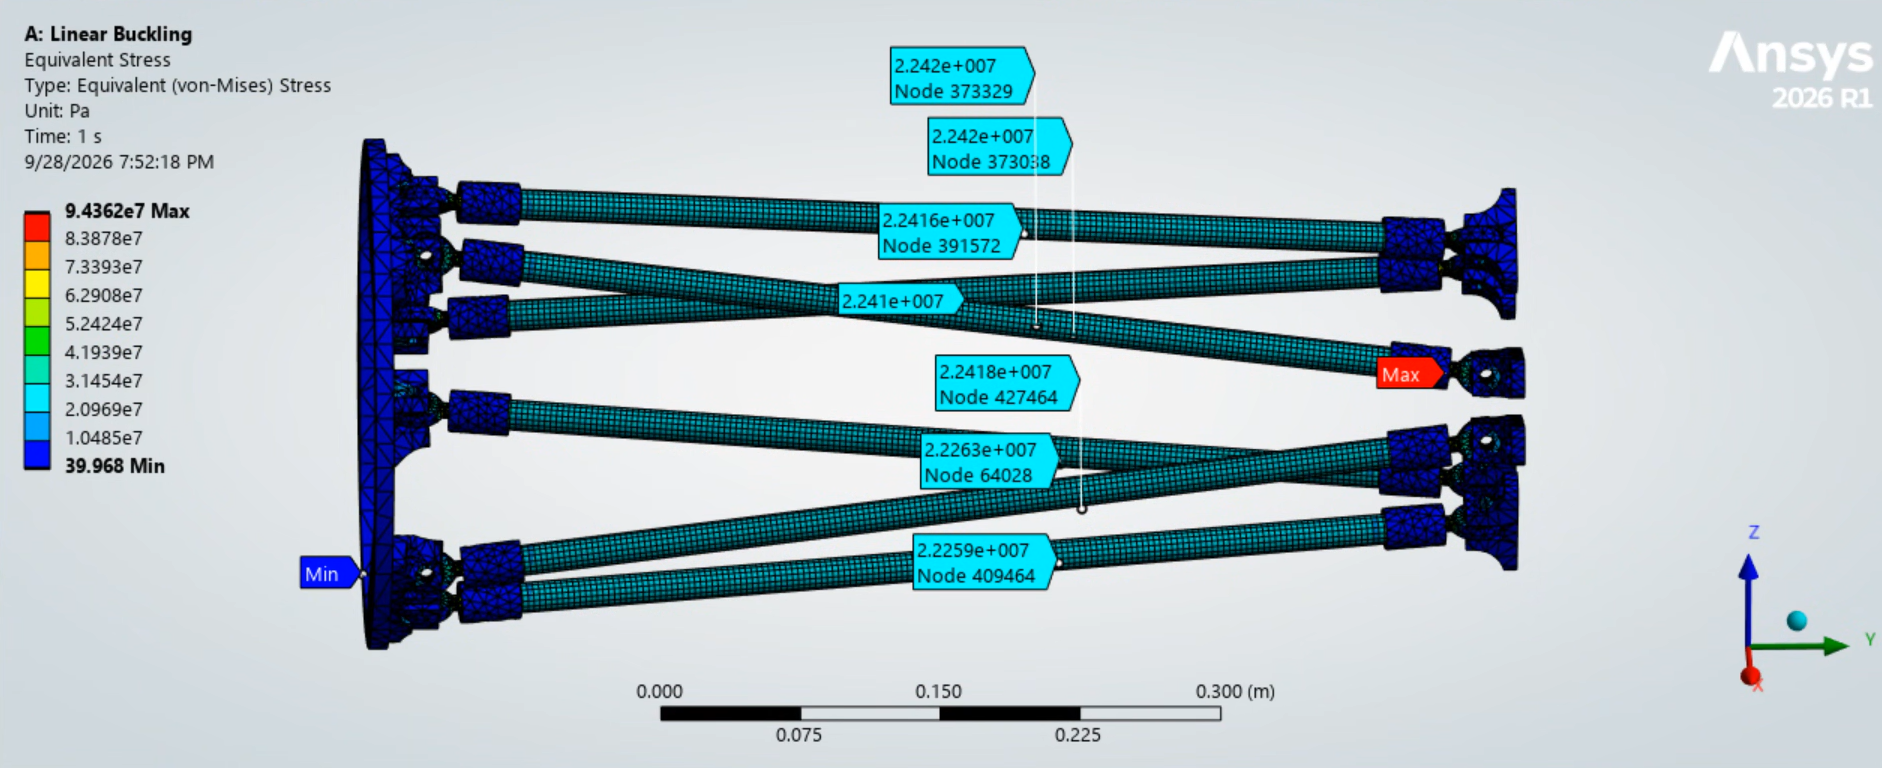
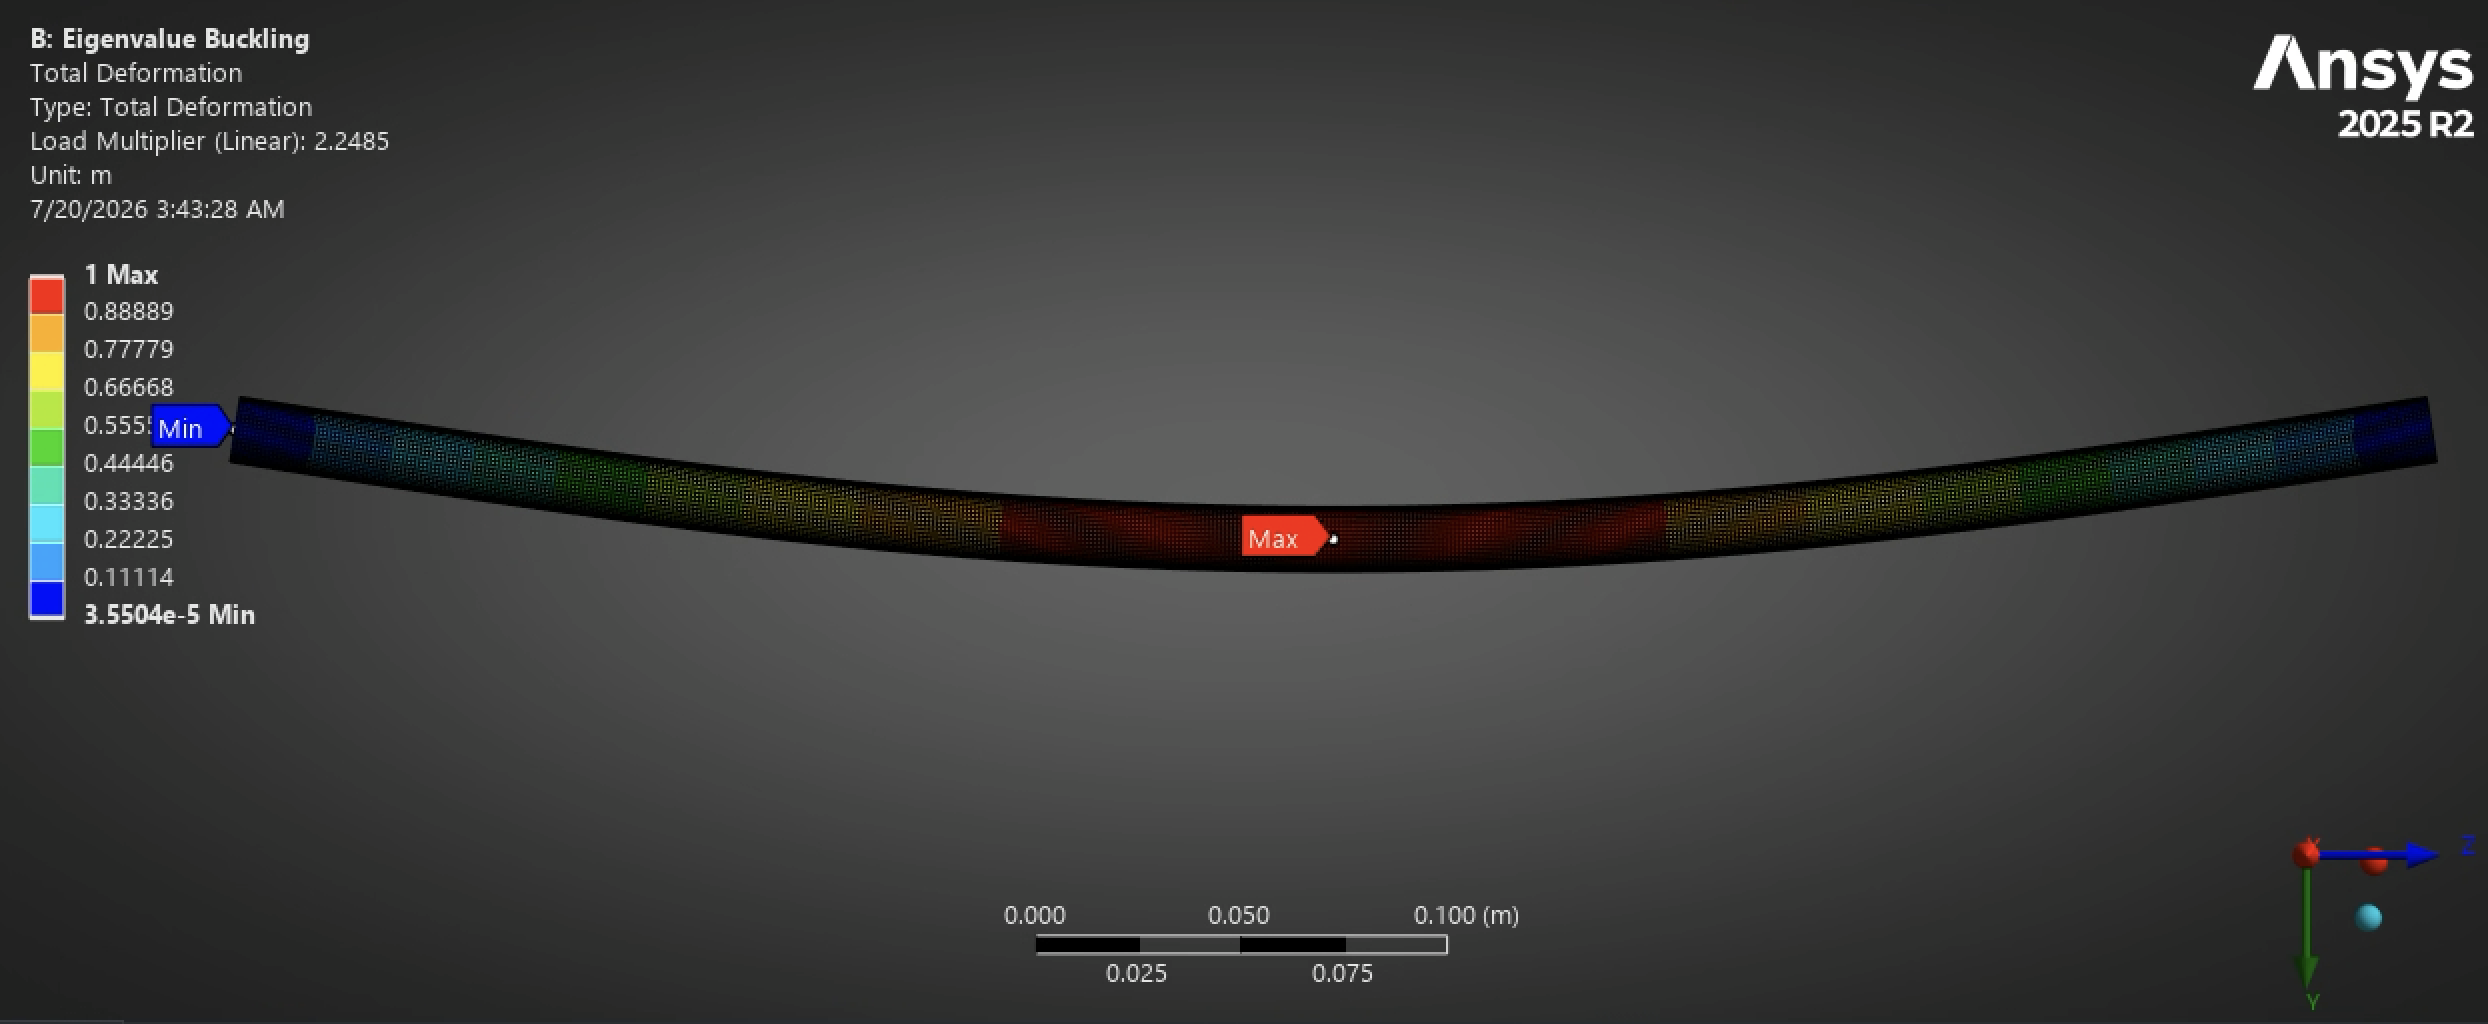
The first global buckling mode produced a load multiplier of 2.2485.
Using the 2,965 N reference load:
The isolated strut therefore achieved an ideal global buckling factor of safety of approximately 2.25, exceeding the 1.5× structural requirement for the evaluated member-level load case.

First global buckling mode of the TTS strut. The predicted critical load was within approximately 3% of the Euler calculation.
The first mode showed the expected smooth lateral bow of an ideal pin-pin column, providing a qualitative check that the model was producing the correct global instability family.
The displacement magnitude displayed in an eigenvalue result is arbitrary. The meaningful outputs are the mode shape and load multiplier, not the displayed deformation value.
Local Wall Buckling
Global column buckling involves the complete member bowing laterally while its cross-section remains approximately intact.
Local buckling is different. It occurs when the tube wall itself wrinkles, ovalizes, or develops circumferential lobes.
I created short tube coupon models to isolate the local wall-buckling family without requiring the complete 21-inch member.

Refined local wall-buckling mode showing repeated helical lobing of the tube wall.
The local modes were identified by:
- repeated inward and outward wall lobes
- cross-sectional distortion
- a relatively straight overall member centerline
- a repeating axial wavelength
- a mode shape distinct from smooth global column bending
Because the tube is circular and nearly axisymmetric, equivalent local modes can appear at different angular orientations or as helical combinations of closely spaced mode pairs.
The visible deformation amplitude is arbitrary and was automatically scaled by ANSYS. The relevant quantities were the mode family and associated load multiplier.
Coupon-Length Convergence
I compared the same local-lobing family using different tube lengths:
- 2.5-inch coupon: 2.1304 MN
- 5-inch coupon: 2.1235 MN
- difference: approximately 0.32%
Doubling the coupon length introduced additional repetitions of the wall pattern but produced almost no change in the predicted local critical load.
This demonstrated that the result was no longer meaningfully controlled by the coupon end conditions.
Mesh Convergence
I then compared the local-mode result using the baseline and refined solid meshes:
- baseline mesh: 2.1304 MN
- refined mesh: 2.1293 MN
- difference: approximately 0.052%
The same local-lobing family appeared in both models while the predicted load remained essentially unchanged.
The local-buckling result was therefore both:
- length-converged
- mesh-converged
The converged linear eigenvalue prediction was approximately 2.13 MN.
Compared with the 2,965 N reference load, this value is roughly 718 times higher.
That ratio is not a physical factor of safety. Linear eigenvalue buckling assumes ideal geometry, idealized constraints, and linear elastic material behavior.
However, the difference is sufficiently large to screen local wall buckling out as a governing failure mode for the selected tube under the evaluated loading.
The more credible member-level concern remains global column buckling, followed by the joint, weld, and interface behavior.
Engine-Side Ring Topology Optimization
After establishing the six-strut architecture, I used ANSYS topology optimization to reduce material in the preliminary engine-side interface ring while maintaining the primary thrust load paths.
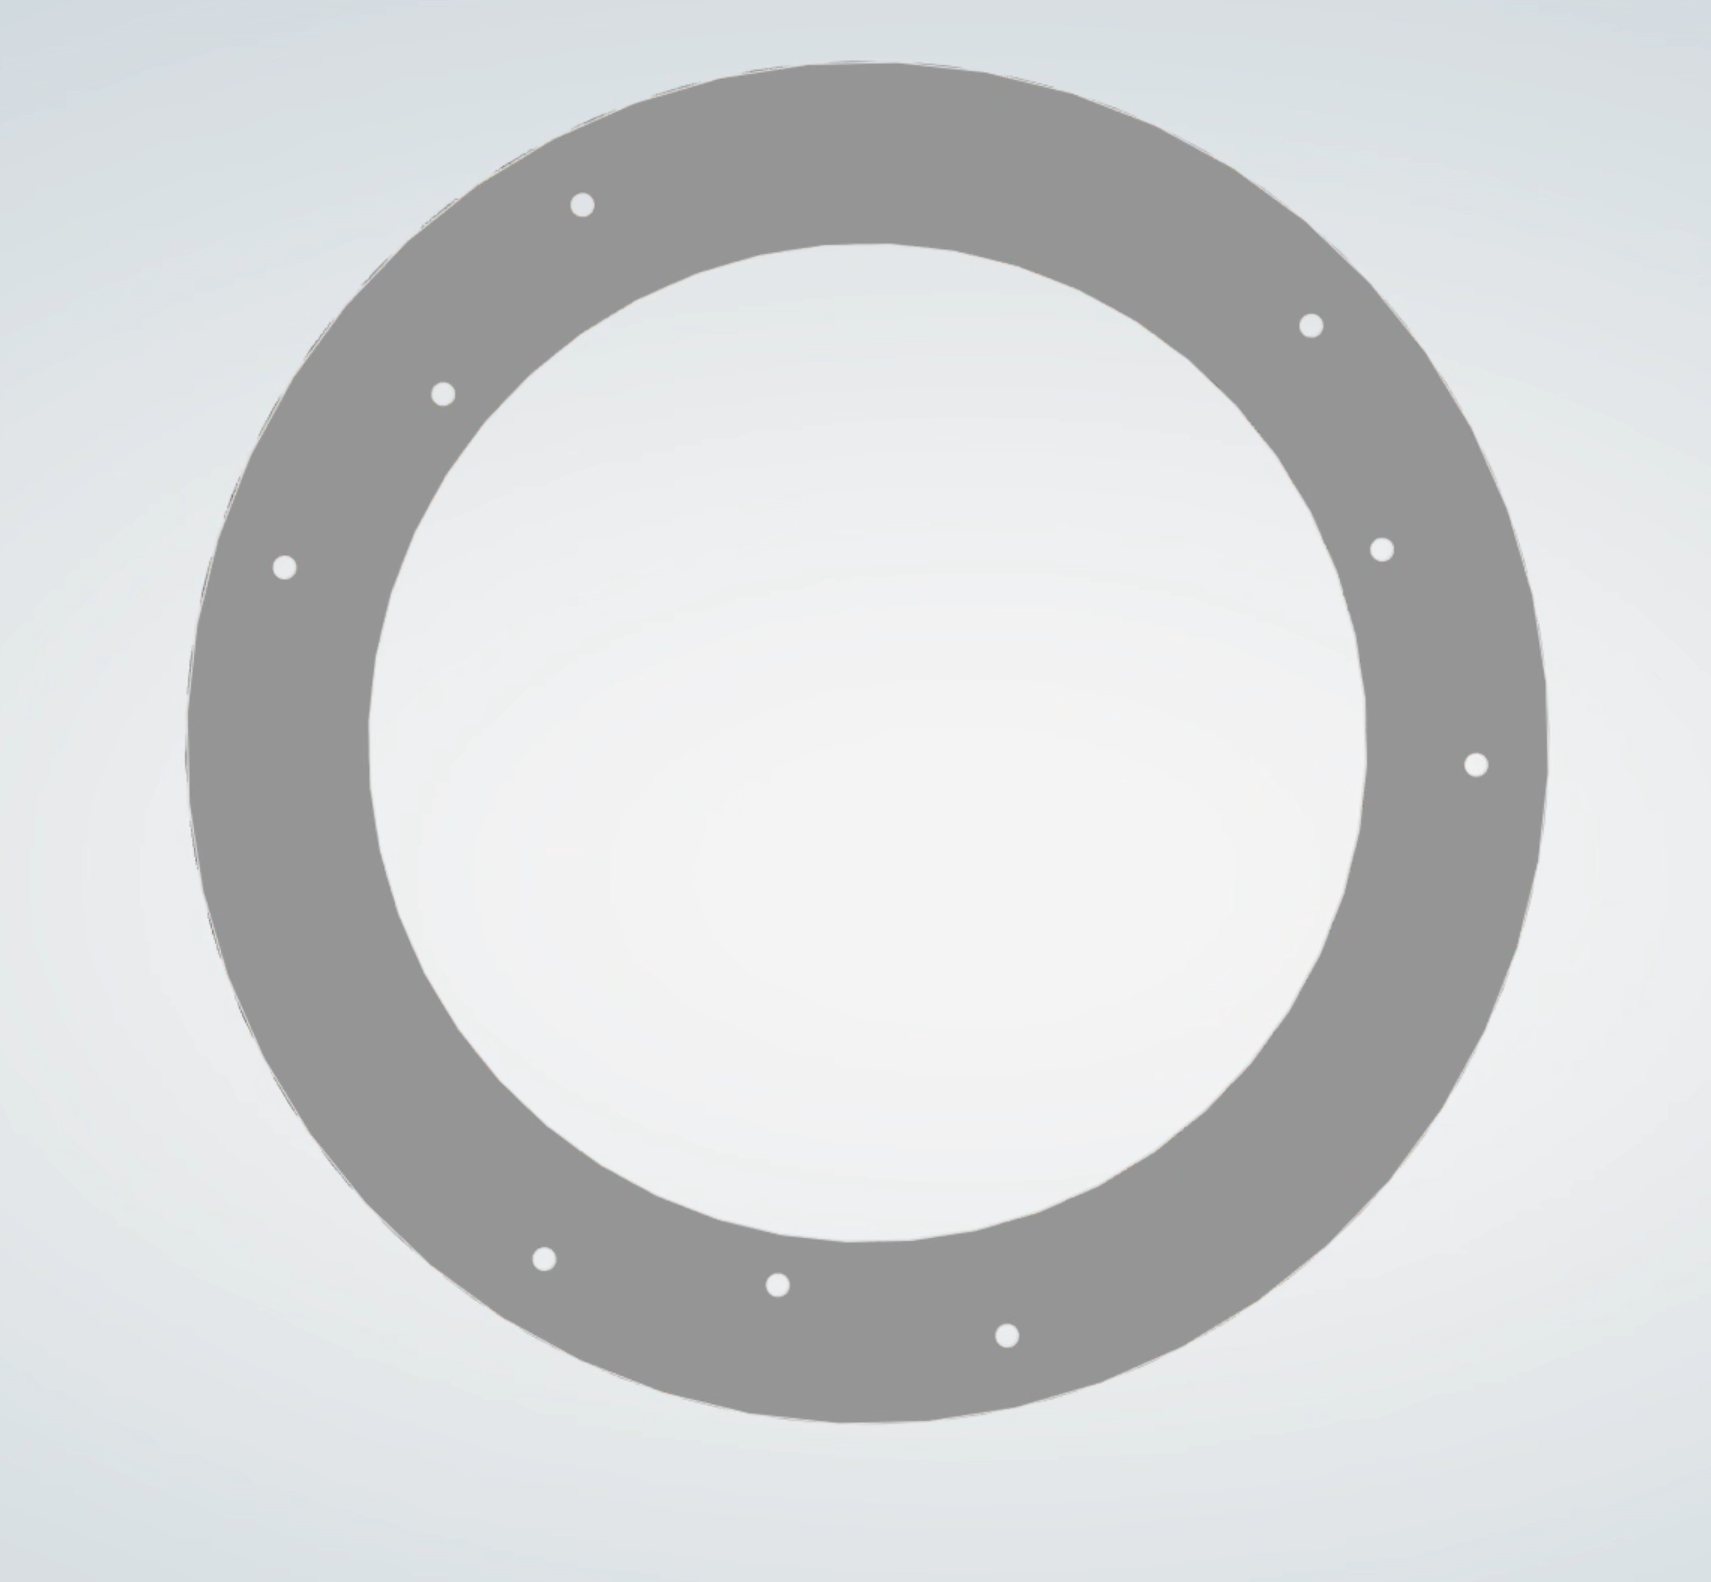
The baseline model applied the full engine thrust through the central interface and transferred the load into the six strut-joint locations. Critical engine and joint interfaces were preserved while the remaining plate material was treated as the design region.
Baseline: Original solid interface ring used to establish the load path and protected mounting regions.
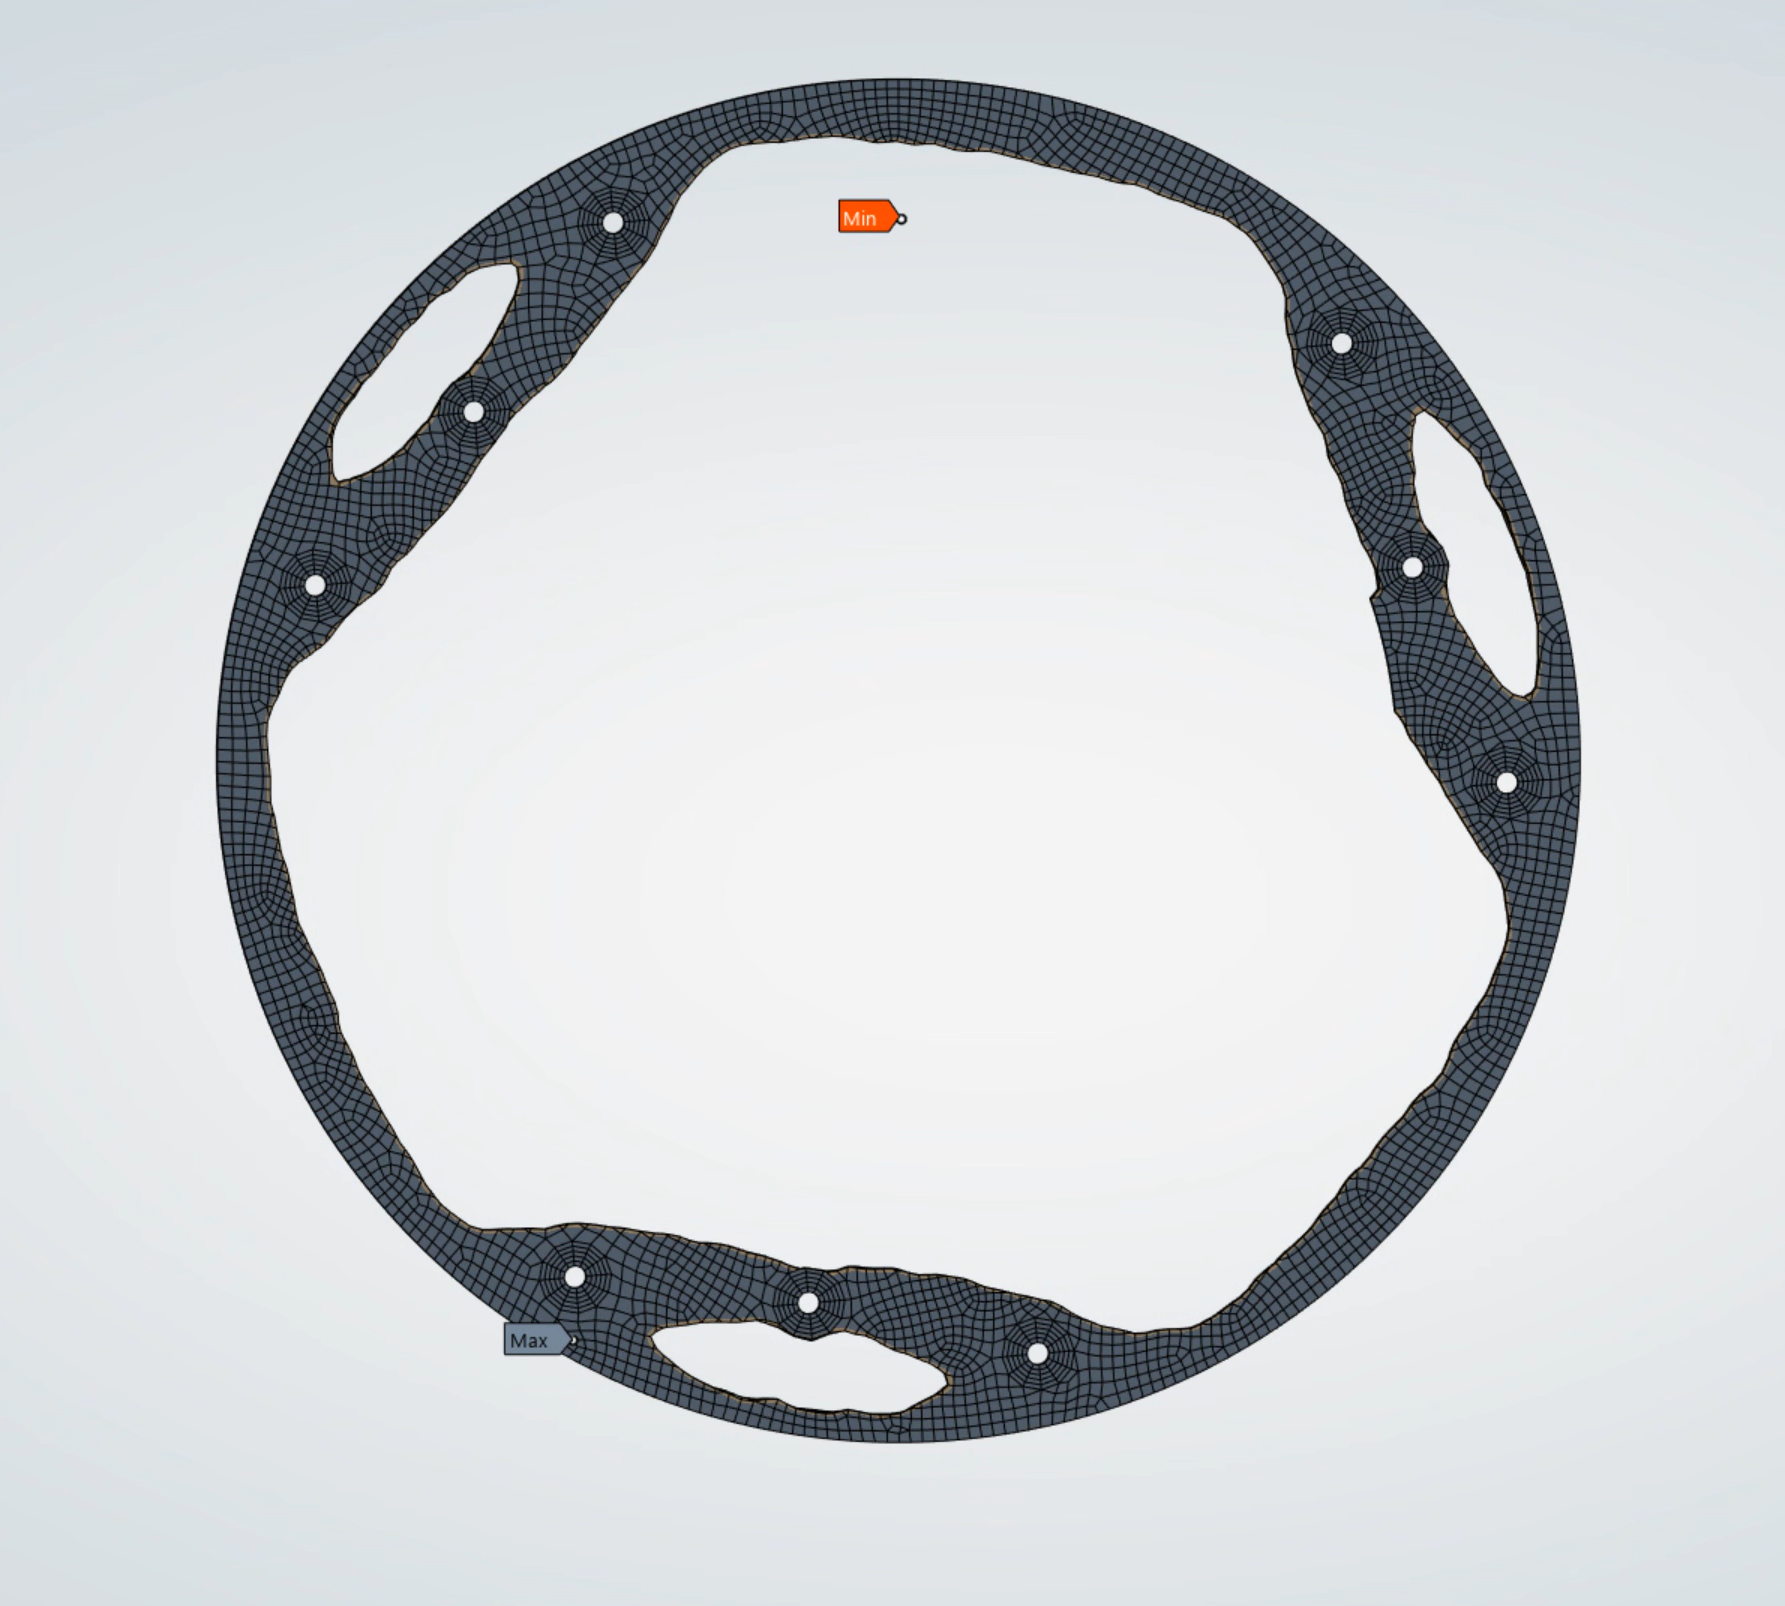
Topology result: Optimization concentrated material along the primary paths between the engine interface and strut joints while opening three low-value regions.
Refined design: The raw density result was rebuilt as clean CAD with three through-pockets, smooth load paths, joint pads, and manufacturable fillets.
Rather than directly manufacturing the organic optimization mesh, I treated it as a load-path study. The result showed that the original continuous plate could be reorganized into a triangular three-lobed structure surrounding the central engine interface.
As a load-magnitude sensitivity check, I repeated the optimization at 2,945 lbf and 4,000 lbf system-thrust cases. Both produced essentially the same three-lobed load-path architecture, indicating that the identified topology was insensitive to load magnitude over the evaluated range under the same loading direction and boundary conditions.
I rebuilt the result as conventional CAD with:
- three large through-pockets
- continuous material around the engine interface
- reinforced regions around the strut mounting holes
- smooth transitions and fillets instead of element-scale topology features
- constant plate thickness for straightforward machining
The refined geometry is then evaluated in a separate static structural model using the same loading and interface assumptions as the baseline design. This provides a direct comparison of mass, stiffness, deformation, and stress after removing the low-value material.
Current Joint Design
Once the basic tube behavior was established, the main uncertainty shifted to the joints and load-transfer interfaces.
I developed compact clevis-style joints intended to:
- maintain a clear axial load path
- allow rotation about the clevis-pin axis
- let each strut behave approximately as a two-force member
- reduce joint size
- reduce part count
- simplify assembly
- provide positive pin retention
- connect cleanly to the interface rings
Bottom Joint

Current lower joint design using a clevis pin and Smalley retaining ring at the strut connection, with two bolts attaching the bracket to the engine-side interface.
The bottom joint transfers load between the engine-side interface and the tubular strut.
The connection uses:
- a welded tube end cap
- a clevis-style bracket
- a clevis pin
- a Smalley retaining ring for axial pin retention
- two bolts connecting the bracket to the interface ring
The welded tube end cap concept and supporting weld calculations were developed by Gabe Popso and incorporated into the current strut assembly.
Retaining-Ring Development
The initial clevis-pin retention concept used conventional C-clips. Although compact, the C-clips provided limited engagement with the pin groove and were not a robust choice for a vibration-sensitive rocket structure.
I therefore investigated alternative retaining-ring designs and transitioned to a Smalley retaining ring with greater circumferential engagement around the clevis pin.
Initial concept: Conventional C-clips provided a compact retention method but limited engagement around the clevis-pin groove.
Refined solution: Smalley retaining ring selected for greater circumferential engagement and positive axial pin retention.
After developing the revised groove and pin concept, I worked directly with Smalley to review the application and identify a compatible retaining ring. Their engineering team reviewed the concept, confirmed the retaining-ring approach was viable, and provided sample rings for prototype fit and retention testing.
This progression moved the joint from an initial C-clip concept to a supplier-reviewed retention solution with physical hardware available for prototype evaluation.
Top Joint

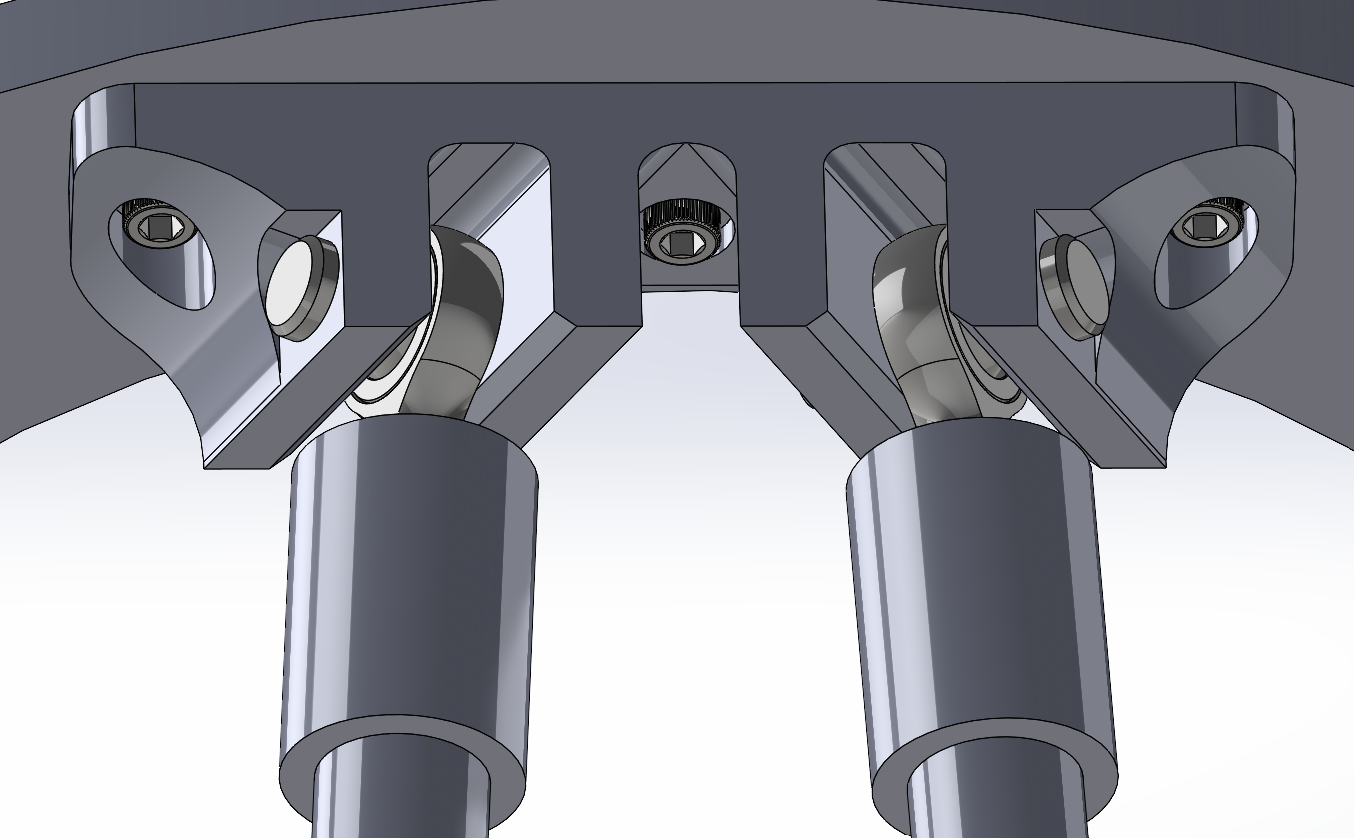
Current upper joint design adapted to the tank-side interface while maintaining the same basic axial load-path intent.
The top joint follows the same basic structural principle but is adapted to the geometry and packaging of the tank-side interface.
The real clevis joints permit rotation primarily about their pin axes.
The simplified member and local-buckling models used idealized constraints to isolate the tube behavior. Those models were not intended to claim that the complete joints had already been structurally verified.
The remaining joint-level work includes:
- clevis pin shear
- clevis pin bending
- bearing stress around pin holes
- bracket bending
- bracket local yielding
- bolt shear and tension
- weld strength
- heat-affected-zone properties
- interface stiffness
- eccentric load introduction
- manufacturing tolerances
- assembly access
System Integration
The analytical sizing, finite element analysis, joint development, and packaging work were combined into the six-member assembly shown at the top of this page.
The six-strut layout replaced an earlier overconstrained arrangement.
Reducing the structure to six primary members created a clearer and more predictable load path without introducing redundant struts whose force distribution would depend heavily on:
- manufacturing tolerances
- joint stiffness
- interface deformation
- assembly variation
The current interface rings are preliminary geometry used to establish:
- overall structural layout
- member locations
- joint orientation
- packaging envelope
- surrounding-system clearances
Their final thicknesses, bolt patterns, mounting features, and local reinforcement will be developed as the surrounding propulsion interfaces mature.
Current Engineering Conclusion
The basic compression-member design is now supported by independent analytical and numerical evidence.
The analysis showed that:
- the MATLAB tool reproduced the first-principles member calculations
- static FEA matched the analytical axial-stress result
- the isolated strut achieved approximately 2.25× ideal global buckling factor of safety, exceeding the 1.5× structural requirement
- global buckling FEA matched Euler within approximately 3%
- the local-buckling result was length-converged
- the local-buckling result was mesh-converged
- local wall buckling does not govern the selected tube design
The remaining design uncertainty is concentrated in:
- joint loading
- weld behavior
- interface-ring stiffness
- unequal load sharing
- thrust misalignment
- geometric imperfections
- nonlinear global buckling
- vibration and dynamic loading
- full-system structural behavior
- physical test correlation
The next major step is therefore not additional isolated local-wall analysis.
It is higher-fidelity joint and full-assembly analysis followed by physical structural testing.
Background and Earlier Concepts
The current design is the result of several earlier concepts and trade studies.
These sections are included for readers who want the complete development history.
Original Sleeve-Bearing and Ball-Joint Concept
Before developing the current clevis-style joints, I explored an adjustable joint architecture using custom sleeve bearings, a shoulder screw, and a ball-joint interface.

Earlier joint concept using custom sleeve bearings, a shoulder screw, and a ball-joint interface to provide alignment adjustment.
The concept was intended to improve:
- alignment tolerance
- assembly flexibility
- accommodation of manufacturing variation
However, the additional adjustability introduced:
- more custom components
- greater manufacturing complexity
- a larger joint envelope
- additional tolerance stackups
- more possible failure points
The later clevis-style design reduced the mechanism to a simpler and more compact axial load path.
Original Full-System Architecture
Early in the project, I developed a full conceptual TTS architecture inspired by the Keg rocket structural layout.

Early architecture exploring standardized perforated members, sheet-metal construction, and circular interfaces.
The concept explored whether standardized components could simplify fabrication and assembly.
It was not carried forward because:
- it consumed too much engine-bay volume
- it created packaging conflicts
- major thrust loads would have passed through fasteners in shear
- its load path was less direct than the later axial-strut architecture
- the propulsion team preferred a cleaner compression-member load path
Although the concept was rejected, it helped establish what the final architecture needed to avoid.
Additional Structural Trade-Study Background
The structural design space included tradeoffs between:
- hollow circular and hollow square sections
- outside diameter and wall thickness
- buckling resistance and packaging volume
- minimum mass and structural robustness
- adjustability and joint simplicity
- aluminum and composite construction
- theoretical efficiency and practical manufacturability
A mathematically optimal component is not necessarily the best system-level design.
The final member geometry had to provide adequate structural performance while also fitting within the engine bay, connecting to manufacturable joints, preserving plumbing space, and remaining realistic for the team to fabricate and inspect.